This article will help you set up your PayPal account to accept international currencies. To find out how to ensure you're ready to accept international currencies, please read on.
Topics in this article:
- The benefits of accepting international currencies
- Accepting international payments
- Additional required step for US sellers
- For commercial PayPal account users
- For private (non-commercial) PayPal account users
The benefits of accepting international currencies
At present, your PayPal account may be set up for your own, domestic market and currency only.
When launching your Business internationally and with revenue coming in from your international listings, you're likely to want to set up your account to include other currencies also. For UK Sellers, this would usually mean adding (at a minimum) EUR, USD and AUD. Likewise for US Sellers, set-up would likely allow for payments in GBP, EUR, CAD & AUD.
Adding currencies allows you to accept payments into specific PayPal currency accounts, USD to USD, Euro to Euro, GBP to GBP etc. It also enables you to Hold the balance of these additional Currency accounts rather than converting the currency immediately. This provides the potential benefit of being able to convert against exchange rate whenever you choose.
For non added Currencies, you'll need to set-up how you accept these payments.
Below, we provide a guide to walk you through the whole set-up. From accepting international payments, adding your chosen currencies, and how to accept non-chosen currency payments:
First of all, let's get your PayPal set-up to accept International Payments.
Accepting international payments
For those currencies you do not wish to add to your account, you need to decide whether to accept payments automatically or manually. This is based on conversion of the currency into your domestic one.
You can choose to Deny the payments or ask whether to accept or deny each individual payment.
If you wish to ensure payments from clients are received without delay, and do not wish to check each and every payment received from these non added currencies, simply click the Yes, accept and convert them option, and save your preferences.
(US Sellers will have Ask me as default, whereas EU Sellers will be defaulted to Yes, accept. We recommend clearly checking your settings to ensure the correct ones are enabled).

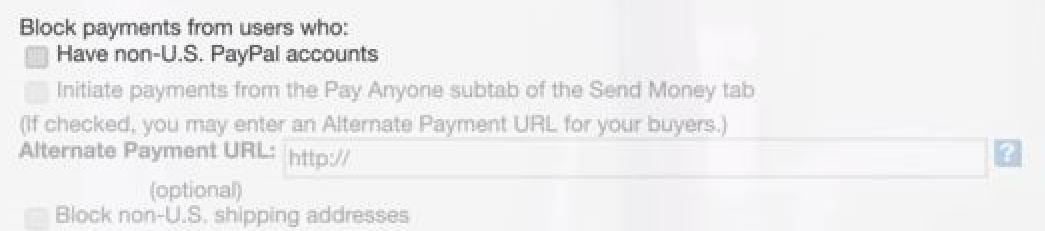
Additional required step for US sellers
To set-up
1. Log in to your PayPal account.
2. Click the Business Profile icon next to "Log Out" and select Profile and settings.
3. Click My selling tools.
4. To enable International payments, Untick the Block payments from users who ''Have non-US (UK etc) PayPal accounts''.
Now you're set-up to receive International Payments, let's add the Currencies you want to your Account. This differs depending on whether you have a Business or Private Account.
For commercial PayPal account users
PayPal have a very clear video guide which is provided below as a step-by-step walk-through:
In addition, we provide a quick snippet guide below:
For private (non-commercial) PayPal account users
Log in to your PayPal account, click on Wallet, then click on PayPal balance. On the subsequent popup, simply click on Manage currencies, then on the following page Add Currency.

You’re done! Now your PayPal account is ready to receive International payments in currencies of your choice.
For Frequently asked questions and additional information, we recommend visiting PayPal's website directly for guides:
How to accept foreign payments with your PayPal Business account.